
In a world where every second counts, trimming your screen recordings on an iPhone is like finding the perfect slice of pizza—essential and oh-so-satisfying. Whether you’ve captured a gaming triumph or a hilarious meme-worthy moment, nobody wants to wade through unnecessary footage. Thankfully, Apple made it easy to snip away the fluff and keep only the good stuff.
Understanding Screen Recording on iPhone
Screen recording captures everything happening on an iPhone’s display. Users can create videos of app interactions, gameplay, or tutorials with just a few taps. This feature is accessible through the Control Center, making it convenient for anyone needing to record their screen.
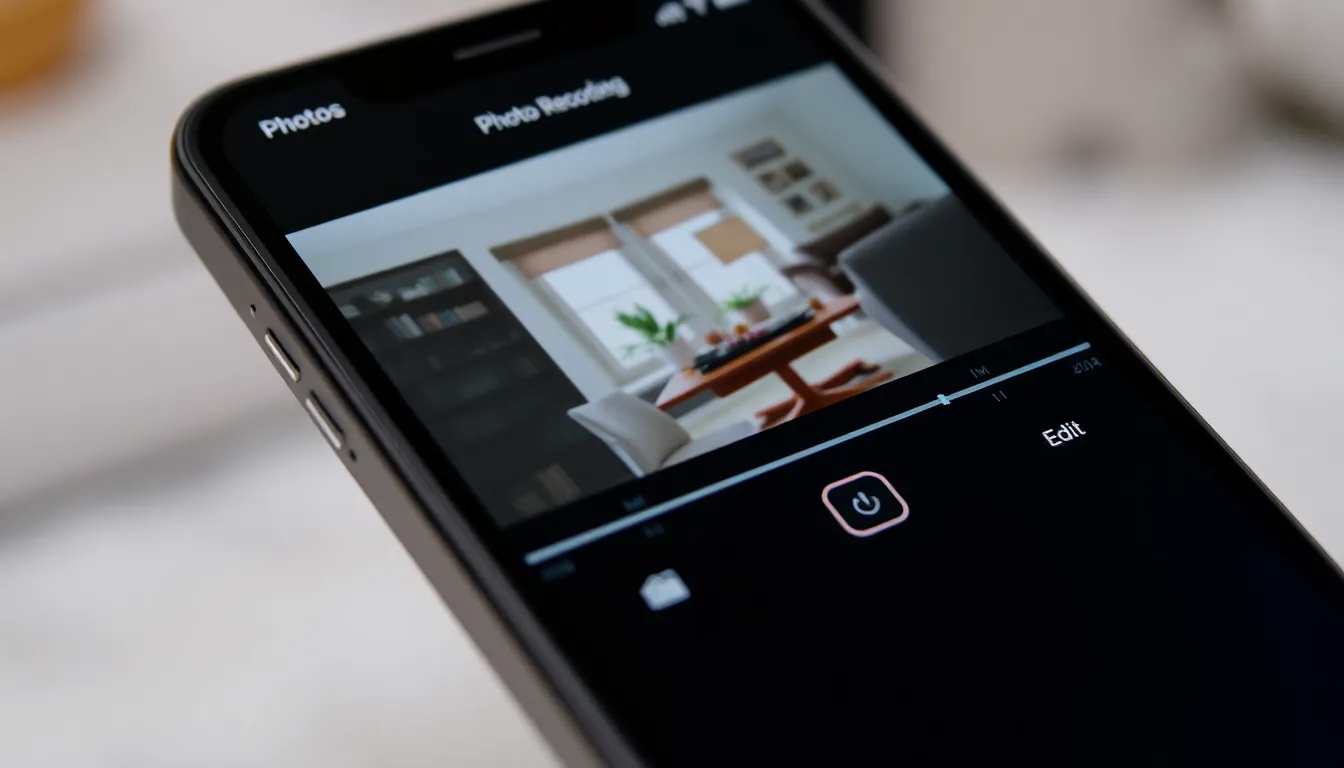
Editing options reside within the Photos app. Once a screen recording is finalized, it automatically saves to the Camera Roll. Trimming is straightforward; users can eliminate unwanted segments to focus on key content, ensuring a polished final product.
Recording can be initiated by adding the feature to the Control Center via Settings. After this setup, accessing the feature becomes simple; users tap the screen recording icon to begin. Visual feedback indicates recording status, providing reassurance that content is being captured successfully.
Post-recording, the editing process enhances the quality of the video. By tapping the recording thumbnail in the Photos app, users enter the editing interface. A timeline at the bottom allows for easy adjustments—a simple drag enables precise trimming of start and end points.
Trimming options become essential when dealing with lengthy recordings. Users typically want to remove the beginning or ending sections that contain unnecessary content. With the visual timeline, adjustments require only a few moments to execute, making it efficient and user-friendly.
Utilizing screen recording features effectively can improve content creation. Whether for educational videos or sharing moments, having the ability to trim captures the essence of the intended message. Understanding and mastering this tool enhances overall output quality.
Steps to Trim Screen Recording
Trimming screen recordings on an iPhone is straightforward and effective. Users can quickly edit their footage to enhance quality.
Accessing the Screen Recording
Locate the screen recording in the Photos app. Open the Photos app on the iPhone, and navigate to the “Albums” tab. Tap “Media Types” and select “Videos” or scroll through the Camera Roll to find the recording. Once found, users can tap on the video to open it for editing.
Using the Photos App
Tap on “Edit” at the top right corner of the screen to enter the editing interface. A visual timeline appears at the bottom of the display, providing controls to trim the beginning and end of the recording. Users control the handles on either side of the timeline, adjusting clips with precision. Preview the trimmed version to ensure it captures the desired content accurately, then finalize changes by tapping “Done.” The app promptly saves the adjustments, leaving the original recording intact for future reference.
Tips for Effective Trimming
Effective trimming can enhance the quality of screen recordings. Here are some helpful tips to consider during the editing process.
Maintaining Aspect Ratio
Maintaining the aspect ratio is crucial for preserving video quality. Users should ensure that the trimmed video matches the original screen recording’s dimensions. Doing so prevents distortion and keeps the visual integrity intact. An aspect ratio of 16:9 works well for most recordings. Selecting the right format not only improves viewer experience but also aligns with standard sharing platforms. Check the dimensions within the editing interface to confirm that the video maintains its original proportions throughout the trimming process.
Previewing Before Saving
Previewing the trimmed video before saving is key to ensuring satisfaction with the final product. Users should take advantage of the preview feature to review all the edits made. This step highlights any unwanted sections that remain after trimming. Assessing the flow and content during preview helps in making further adjustments if necessary. It ensures the trimmed video meets the desired outcome. Only after confirming that everything looks good should users proceed to save the changes and finalize the editing process.
Common Issues and Solutions
Users often encounter problems when trimming screen recordings on an iPhone. One common issue is the accidental trimming of essential content. This occurs when users aren’t precise with the visual timeline adjustments. To resolve this, zooming in on the timeline ensures more accuracy during edits.
Another frequent problem is not finding the correct recordings in the Photos app. Users sometimes overlook saved files. Taking time to check the “Albums” section and selecting “Media Types” can help locate screen recordings swiftly.
Occasionally, the Photos app may freeze while editing. This can frustrate users wanting to finalize their clips. Restarting the app or the iPhone frequently resolves this freezing issue. If problems persist, checking for software updates can ensure that the app runs smoothly.
Users may also face quality issues after trimming their videos. Screen recordings sometimes appear pixelated or distorted. Ensuring that the aspect ratio matches the original, ideally 16:9, preserves the video’s quality. Avoiding any drastic changes helps maintain the visual integrity of the recording.
Users might also forget to save their edits. After changing the length of the recording, it’s crucial to tap “Done” to save changes. To prevent losing any progress, users should regularly check that edits are saved.
Lastly, some may want to revert to the original recording after trimming. This option is available, as the Photos app saves the original file intact. Users can always return to the editing mode, select “Revert,” and return to the unedited version.
Trimming screen recordings on an iPhone is a straightforward process that significantly enhances the quality of video content. By removing unnecessary footage users can focus on the most engaging moments whether for sharing or educational purposes. The intuitive editing features in the Photos app make it easy to fine-tune recordings ensuring a polished final product.
With careful attention to aspect ratios and a quick preview before saving users can maintain video quality while achieving their desired edits. Embracing these tools not only streamlines content creation but also elevates the overall viewing experience. Users can confidently trim their recordings knowing they have the flexibility to revert to the original if needed.